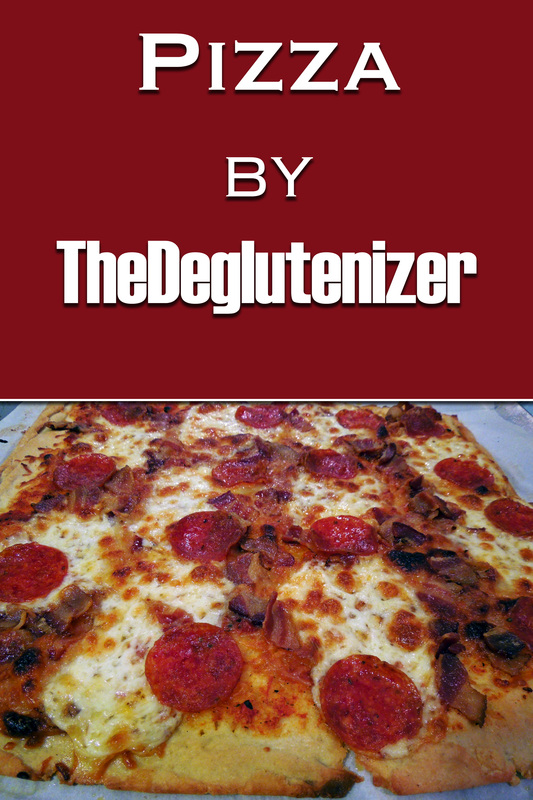
Remember that tomato sauce we made a while ago? Time to put it to good use! I’m having some friends over to watch Supernatural and old martial arts flicks, and they’re huge fans of my pizza. The key to good pizza? An awesome crust! Oh, and all your favorite toppings.
Ingredients:
1 c. gf all-purpose flour
1 c. rice flour
¼ c. coconut flour (or more AP flour)
1 envelope yeast (live active or pizza), or 2 ¼ tsp. live active yeast
1 ½ tsp. sugar
1 tsp. salt
1 c. warm water (120°)
3 tbsp. olive oil
2 tsp. xanthan gum
Sauce
Cheese
Toppings
Directions:
1. Check directions on yeast for proofing instructions. An envelope of pizza yeast can probably be mixed in without proofing, but live active yeast will need to be proofed.
2. If proofing is required: combine warm water, sugar, and yeast and set aside. In large mixing bowl or food processor with dough blade, combine flours, salt, and xanthan gum. Add proofed yeast mixture and mix on lowest setting. Drizzle in olive oil at the end and continue mixing until dough ball forms.
3. If proofing is NOT required: combine all crust ingredients except water and olive oil in large mixing bowl or food processor with dough blade. Add warm water and mix on lowest setting. Drizzle in olive oil at the end and continue mixing until dough ball forms.
4. Dough will be too sticky while warm to handle. Loosely wrap in plastic (yeast may cause dough to expand, give it room to rise if it’s going to), and place in refrigerator at least two hours so flour can hydrate and yeast can ferment.
5. When ready to assemble, preheat oven to 425°. Dough should cover 1 cookie sheet/half sheet pan, or 2 round pizza pans. Dust everything in additional flour/starch before rolling out (rice flour adds a nice crunch on the outside), or line pan with parchment paper. Roll dough out from the center, then around the edges to crimp any tears back together. A small can in a plastic bag may work better than a traditional rolling pin on sticky gluten-free dough. For a crispier crust, pre-bake 5-8 minutes before adding sauce and toppings.
6. Add sauce, cheese, and toppings as desired. Bake on bottom rack of oven 12-15 minutes for fewer toppings, 15-18 for lots of toppings (shorten bake time 2-3 minutes if crust was pre-baked). Rotate the pan as necessary if your oven is too hot or heats unevenly.
7. Remove pizza from oven when cheese is bubbly and toppings are crispy. Serve hot and enjoy with friends and family (or throw it in the fridge for breakfast tomorrow morning…not while it’s still hot, though, then it’ll just get soggy).
Boom, super-awesome gluten-free pizza. And yes, you could add flavorings of all kinds to your crust, from garlic powder to fresh rosemary to parmesan cheese and more! Feel free to experiment to your heart’s content. Oh, and I’ve got a few extra tips to go with this recipe:
1. Roll dough directly on the pan, transfers don’t work. Gravity wins over gluten-free every time.
2. Either oil and flour the pan or use parchment paper to avoid sticking. Parchment paper may be the best option because you can use it to transfer the pizza onto a serving dish that hasn’t just spent 15-20 minutes in a 425° oven.
3. When rolling out the dough, use the can in a bag trick. The large surface area of a rolling pin can rip your dough right in half and roll it up onto the pin, never to fully unstick again. Which is weird, because that implies that gluten-free can sometimes beat gravity, and I just said that it can’t. Either I’m a liar, or gluten-free dough likes to defy physics when it’s least convenient for you.
4. Use both fresh mozzarella and shredded. Fresh mozzarella turns deliciously gooey, but shredded gives those dark crusty spots on top that we all crave from delivery pizza. If you like your cheese gooier, use more of the fresh. If you like it with more of those crispy dark spots, use more shredded.
5. I like Hormel pepperoni the best of the widely available brands. I’ve tried Boar’s Head, but I think it’s sliced a little thinner and the fat content is different, because it always burns when the Hormel never does. And it’s like $2 more per package, so it’s kind of a waste to spend more on pepperoni just to burn it.
6. Fresh spinach, kale, or mushrooms go under the sauce and cheese. These products don’t contain much water, so they’ll dry out and burn before the pizza is done if out in the open air of a hot oven. The cheese will shield these products from direct heat so they won’t get the chance to dry out. If you want to put these items on top, use frozen spinach or kale, or canned mushrooms. Actually, I like canned mushrooms better than fresh on pizza, anyway. They’ve got a lot of extra mushroom flavor.
And that’s how you make awesome gluten-free pizza. You can make the dough up to two days in advance, but I wouldn’t do it any earlier than that because refrigerators like to dry things out. If your dough will be in the fridge for more than a few hours, I’d suggest putting it in a large snap-top container so the moisture can’t escape out into the air. Also, don’t make your dough too far in advance because it could start brewing, and sour beer flavor doesn’t really go well with pizza (not actually in the pizza, anyway).
Enjoy your gluten-free, crunchy, cheesy, gooey, crispy, greasy deliciousness! Leave your thoughts in a comment below, or get in touch with me directly by filling out the form on the contact page.
Follow me on Instagram!
https://instagram.com/thedeglutenizer/
Like me on Facebook!
http://www.facebook.com/TheDeglutenizer
Follow me on Twitter!
http://twitter.com/TheDeglutenizer
Follow me on tumblr!
http://thedeglutenizer.tumblr.com
Follow me on Pinterest!
http://www.pinterest.com/thedeglutenizer/
 RSS Feed
